Saturday, June 11, 2005

Brakes (more) - 2.5 Hours (96 Total)

Today I spent a little more time on the brakes. I drilled a hole in one of the brake shoes for the lower spring to use. This made both brakes actuate with approximately the same force. I also assembled all three wheels and started working on the main gear legs. Unfortunately, my 1/4 inch drill bit is too dull to drill through the gear legs. Lastly, I installed the stopper bolts for the rudder peddles.


Friday, June 10, 2005

Wing Transport - 0 Hours (Total 93.5)

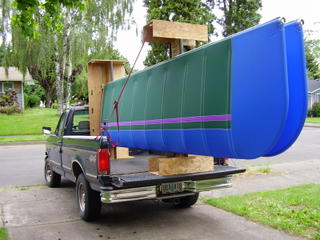
With the help of a few friends I loaded the wings onto the transport brackets I made and loaded them into my truck.

I arranged to have them clear coated at an RV paint shop.


Thursday, June 09, 2005

Brakes - 1.5 Hours (93.5 Total)

Today I put together the brake assemblies. I spent most of the time rounding the edges of the brake pads and other parts. I drilled extra holes to allow the springs to stretch farther but I couldn't get the spring tabs into the new holes because the spring didn't have long enough ends. I ended up leaving one set of pads as is. The other has the upper spring (near the pivot) in two new holes. The lower spring used one new hole.

Sunday, June 05, 2005

More Skinning Right Wing - 6.5 Hours (92 Total)

Today I attached the fabric to the right wing's root rib. I proceeded to tighten the fabric and install the ribs. Since I am still waiting on a plastic rib heel, I left out a center rib set. I had problems with getting the top rib, closest to the tip, installed. I tried trimming the plastic tip but it didn't seem to help. I ended up trimming 1/8 inch off the rib. This allowed the rib to install but required considerable force.

I then cut exit holes for the two strut plates, jury strut bracket, and fuel tank filler. I then used a hot air gun and iron to work out all of the wrinkles. I was able to get all the wrinkles out of the tip. I used a soldering iron to clean up any frayed fabric edges and thread ends.

Saturday, June 04, 2005

Skinning Right Wing - 3 Hours (85.5 Total)

Today Randy came over and helped me slide the skin on to the right wing. I attached the skin to the root rib and tightened the skin. I started installing the ribs but noticed that the velcro seam on trailing edge was not centered very well. It was within the 1/2 inch that the manual states but I noticed that the fabric at the tip had severe wrinkles. I assumed that I could minimize the wrinkles if the skin was centered. I disconnected the skin from the root rib and slid the skin off a couple of inches. I then slowly worked the fabric until the seam was centered on the trailing edge spar. I brought the fabric back up, flush with the root rib. The wrinkle did not go away, in fact it was worse. We'll see what it looks like when I tighten the root rib and install the other ribs.

Monday, May 30, 2005

Prepping Right Wing - 3.5 Hours (82.5 Total)

Today I prepped the right wing for skinning. This included: installing select fuel lines, drilling holes in the root rib, installing the flap teleflex cable, and taping over the bolt heads. I also taped the tension cable. I also assembled the ribs. I started skinning the wing and got as far as I could without help.

Sunday, May 29, 2005

Heat Shrink Left Wing - 7.5 Hours (79 Total)

Today I started ironing out the wrinkles on the left wing. Unfortunately, the green fabric changes color when ironed. This wasn't a big problem but required me to iron the entire fabric instead of just spot ironing like I had done earlier.

I installed the top and bottom ribs without too much problem. I quickly learned that extra finesse is needed to make sure the ribs are inserted in the pockets. I did break one of the plastic heals. The piece is still inside the wing. I'll need to order a new one since I don't have any extras. The top rib was very difficult to fully insert. I don't know what caused this or what allowed it to fully insert. I ended up playing with it for ~25 minutes.

I used my soldering iron to cut exit holes for the two strut plates, jury strut bracket, and fuel tank filler.

I used the hot air gun and iron to remove any remaining wrinkles. For the most part, the fabric is nice and taunt. The exception is the wing tip. I was able to get most of the slack out but the last few wrinkles wont come out. I ended up melting some of the fabric with the hot air gun. Luckily the fabric is reinforced with multiple layers in that location.

Saturday, May 28, 2005

Skinning Left Wing - 8 Hours (71.5 Total)

Today I put the fabric on the left wing. This included prepping the wing. I installed the long aileron push/pull tube, flap teleflex, and select fuel lines. I used a 3' 5" fuel line for the rear fitting and a 14" fuel line on the front fitting. Since the middle fitting is accessible, I didn't bother connecting a fuel line to it. I used tarp repair tape (thick) as an anti-chafe tape on the bolt heads, tip wraps, wing tip gussets, and root rib edges. I tried several techniques for applying the tape to the bolt heads. The one I ended up with required me to cut a slit in the tape from the middle out. This allowed me to apply the tape in a cone shape. I also removed the overlap with my utility knife.

I attempted to skin the wing without any help. After several hours and only having 1/3 of the skin on, I had a friend come over and help. Within 30 minutes we had the skin within 12" of the root rib. I installed the first top rib which was easier than expected. Getting the skin the last twelve inches, to the edge of the root rib, was tedious. I was able to do it without the all-thread which is recommended but it required prying the root rib after the pan head screws were installed.

Friday, May 27, 2005

Heat Shrink Flap and Ailerons - 3 Hours (63.5 Total)

Today I finished de-wrinkling the ailerons and flaps. I used my clothing iron. I also started prepping the left wing for fabric. I noticed that the left tank has a straight fitting where is should have an angled fitting. I replaced the forward fitting with the correct type. I did not perform a leak test.

Friday, May 20, 2005

Heat Shrink Tail - 4 Hours (60.5 Total)

Today I used a heat gun to de-wrinkle all of the tail components. I also used a soldering iron to clean up any fraying fabric. I then wrapped the tail pieces in garbage bags to protect them from dust and dirt.

Saturday, April 23, 2005

More Wing Construction - 3 Hours (56.5 Total)

Today I replaced the AN4-25ALP bolts which old the aft strut plate in place. The original bolts were too long. I ordered new bolts from Rans. I also attached the left fuel tank. I also attached hardware to the wing root transportation bracket.

Sunday, April 17, 2005

Wing Transport Fixtures - 0.5 Hours (53.5 Total)

Today I verified that the left fuel tank is leak free. I also assembled my wing transporting fixtures.

Saturday, April 16, 2005

Fuel Tank Fix - 0.5 Hours (53 Total)

Today I installed the new fuel tank fittings I received from Rans into the left fuel tank. I also plugged the fittings which were installed in the wrong locations with threaded stainless steel plugs.

This tanks had some type of residue inside it. Dish soap, gasoline, nor Simple Green worked at cleaning the tank. 409 did work.

I then leak tested the tank by filling it with hot water and letting it sit over night.


Friday, April 01, 2005

Fuel Tank Install - 5.5 Hours (52.5 Total)

Today I installed the fuel tank into the right wing. I also assembled most of the left wing.

Wednesday, March 30, 2005

Fuel Tank and Caps - 2.5 Hours (47 Total)

Today I verified that the right tank is leak free. Prior to this, I placed the fuel tank frame in the right wing. I need to let the fuel tank dry before I install it into the wing.

I also assembled the two fuel tank caps.


Monday, March 28, 2005

Fuel Tanks - 2 Hours (44.5 Total)

Bad day... Today I worked on the fuel tanks. I drilled and installed the fuel fittings correctly into the first tank but I incorrectly placed two of them in the left tank. I will probably need to order a new tank.

Sunday, March 27, 2005

Wing Construction III - 3 Hours (42.5 Total)

Today I attached the tension top rib, alieron push/pull tube, and alieron push/pull tube guide.


Saturday, March 26, 2005

Wing Construction II - 9 Hours (39.5 Total)

Today I rented an air pop rivet tool... which ended up working very well. I finished attaching the hardware to the leading edge and trailing edge spars. I also put together one of the wings. I still need to put the built-up rib on the first wing.

Wednesday, March 23, 2005

Wing Construction - 1 Hours (30.5 Total)

Today I started attaching the hardware to the leading edge spars of the wings. Unfortunately, the 3/16 stainless steel rivets are too much for my hand riveting tool. I will need to but a new tool.

Sunday, March 20, 2005

Flaps and Ailerons Skinning - 5 Hours (29.5 Total)

Today I skinned the flaps and ailerons. The skins went on very easily but I did have problems with the tension ribs. The screw holes for the ribs did not line up with the holes in the flaps and aileron frames. I ended up reaming out the holes in the flaps and aileron frames to allow the screw holes to align.